Tuesday, January 19, 2016

Quick and Easy Snacks for Kids: Animal Shaped Garlic Bread

Every time we're craving for a garlic bread we can easily make at home using just 2 ingredients a loaf bread and a garlic margarine spread. And with just 3 basic steps, slice loaf bread, spread garlic margarine spread & toast it for around 3 mins.

Our homemade garlic bread sticks
I prepared a batch for Hubby last Sunday. I wanted to prepare some for Jashley as well but I know that she's not fond of eating breads, she prefers biscuits or cookies rather than bread. I have tried offering her breads with different spread but usually she will only take a bite or two.

I remember I purchased a cookie cutter one grocery trip. So I took them out and made these cuties and see if this will do the trick in making her eat bread.


I prepared one of each animal shape only so as to not waste a lot of food if ever she doesn't like it.


But lo and behold, she finished them all and still requested for more.


But this time I offer to her the plain bread using the transportation shaped cutter. She was able to finished them too.


The next day (which was yesterday) when we arrived home from work my MIL told me that my Little Girl kept on asking for the "Animal Bread" the whole day. So I promised to make a batch for her the next day (which is today).

It's so easy that I manage to make them before I left for work. Took me 15 mins to prepare them.

Cut the bread using your preferred cookie cutter

Spread garlic margarine on them
Toast them 
And enjoy them

Update: Happy to report that she was able to finished them all again.

Wednesday, January 13, 2016

Human Heart Nature Products Haul & Review

Last December these Human Heart Nature Products were the ones I got as an exchanged gift on our company Christmas party.


We were actually allowed to list down our wishlist so who ever got our name have an idea what we wanted to receive. Because of that, one of my office mate approach me and told me that his sister is a dealer of HHN products. Thank goodness it is now easier for me to purchase HHN products. I Immediately purchase some of HHN products that I wanted to try.

Look what I found on top of my desk when I arrived at the office 2 days after I place my order.


Here's my loot. These are mostly in sample sizes, so I won't waste too much products if ever it won't work for me.

 
I love Human Heart Nature because according to them their products are all Philippine made, 100% natural/organic and cruelty-free.

One of their products that I love most is the Sunflower Beauty Oil, this product helps my pimple marks and some of my scars lighten you just have to patiently apply it religiously to see the effect. I sometimes use it also as a face & body moisturizer, I actually want this to include on my nightly skincare stuffs but it has this musty scent that lingers too long on the skin after applying and also leaves a musty odor on my sheets as well, but it sure does moisturizes my face and hydrates dry patches on my face. It is also great as a make up remover. I have also tried it to lighten Jashley's insect bite marks. The only thing that I don't like is again the smell of it after around 2 months from opening. It supposed to be unscented and it is sure doesn't smell anything upon opening but it went rancid after couple of months even if I store it away from sunlight.


Next is their Kids Natural Shampoo and Body Wash for girls, I got this in biggest size (500ml) this time. You can read my review about this product in this post if you wanna know why.


Another product that I love is their Bug Shield DEET-Free Oil, I bought this because my little girl's skin is sensitive and prone to mosquito bites and just recently there were alarming incidences of dengue in our town. I regularly applied it on her arms and legs especially when were out and it definitely keeps bugs away. I also mixed around 10 pumps of this oil to a 100ml of alcohol, put it in a spray container and regularly spray it inside the house especially on her play area so mosquitoes won't linger there.


Another amazing product is the HHN Rescue Balm, it soothe and heal nicks, bumps, and small skin irritations. I love its pleasant scent and it works wonders on removing the itchiness and redness of insect bite, even my Mom who is also prone to mosquito bites fell in-love with this product and ask me to buy a pot of this for her.

I also love their Calming Massage Oil, it helps calm my senses after a tiring day at work. I love its scent and how it absorbs into the skin easily, no sticky feeling at all. And just recently I made a homemade coffee ground scrub using just 2 ingredients, coffee grounds and this Natural Calming Massage Oil. I just mixed an equal part of each ingredients. Will try to make a separate post for this.


Next is the HHN Day Moisturizer that I got as gift, I love that it feels light, very absorbent, and it doesn't feel greasy on the skin. Which led me in purchasing its counterpart-the HHN Night Moisturizer. The scent is almost like the Day Moisturizer. But in contrast to the day moisturizer the Night Moisturizer is more fluid in consistency, it is easily spreads and sinks on to my skin making it hydrated from night till morning. Overall I love that they are both effective in rejuvenating my skin's moisture. Plus I've never had a single case of breakouts while using both products.


Human Heart Nature Purifying Facial Scrub with Strawberry Seeds, is another amazing finds
for me. I have been using this for a month now, thrice a week and I never experienced any drying on my skin and also never had any breakouts. I love the fact that it exfoliate my skin the natural way because it made with real strawberry seeds and fine bamboo granules that soften skin while gently removing dirt and toxins. Will definitely purchase another one.


Because I have an oily skin I give this HHN Balancing Facial Wash and HHN Balancing Face Toner a try. I'm glad that the facial wash definitely does its job on cleaning my face minus the tight feeling after washing. It leaves a shine-free face every after washing and I noticed that my face is now less oilier. I also love that the beads/scrubs are very minimal and is not harsh on the skin as this facial wash is intended for everyday use. I always got sold to anything that promise gentle exfoliation. And it feels safe having known that those scrubs (bamboo scrubs and loofah) and micro beads (sugar beets and aloe vera) were all natural. On the other hand the balancing facial toner works great too on my face. I seldom use toner because most of the toner products I have tried usually irritate my skin and eyes maybe because they were alcohol-based toner. But this one does not contain alcohol, yes it stings a little but tolerable, it doesn't irritate my skin nor made me breakout, it has this instant glowing effect on my skin, it smells really good, and makes my skin visibly clear and radiant. I can say that there's an improvement on my skin in terms of oil control by using using this Balancing Facial Wash and Face Toner.


Next on the list is the HHN Tinted Lip Balms. The flame tree (red) variant was the one I was able to try, I like it's minty feel on the lips, it is moisturizing enough, prevent my lips from chapping, no irritation felt, and most of all it is affordable. I use it also to prep my lips before using my favorite lipstick. I re-purchase another flame tree (red) variant along with the other variants which are Pink Orchid (pink), and Island Kiss (coral), but since I gifted them to my sister and friends I cannot make any review regarding the other 2 variants.


I bought the HHN Gentle Cleansing Oil because I am currently running out of make up remover, so given that this one is affordable compare to other make up removers and I wanted to try an oil-based remover, why not give it a try. I love that it can melts away thick foundation and it also feels gentle when massaging on the skin but because of its thick consistency its hard to completely wipe it off and always leaves residue. And even after washing with cleanser I can still feel a thin sticky film on my face. It also cannot completely remove eyeliners on my eyes, and tends to creep inside my eyes giving me blurred vision while using it in removing eye makeup. I don't think I will re-purchase this again and will probably go back to my old make-up remover.


The last product that I will be reviewing for now is the HHN Premium Deodorant Roll-on. I purchased this because I wanted to replaced my regular deo with something organic/natural.  As much as I wanted this product to work on me unfortunately, this isn’t doing a good job on me. It didn’t give me the protection I need especially when I am out and about. I actually love the light scent of it upon application but it becomes unpleasant when mixed with perspiration. In that case I will definitely not re-purchase this again.


I also bought the Nourishing Facial Wash and Nourishing Face Toner but I gifted them to my sister so I cannot make a review of them as well.

That's it for now. How about you guys have you tried some of their products too?

Tuesday, January 5, 2016

DIY Math Manipulative: Geoboard

I recently discovered Geoboard while I was searching for an activities I can prepare for Jashley, I'd never saw or even heard of a Geoboard before. I got curious and started googling about it.

What is Geoboard?

A geoboard is a manipulative tool used to explore basic concepts in geometry such as area, perimeter, triangles and other polygons. It is great in developing early mathematical skills of children that will help them with problem solving, critical thinking, and learning spatial awareness.

As a child I grew up hating Math because I find it difficult to understand, well aside from the basic addition, subtraction, multiplication and division. I don't want Jashley to be like that, I want her to love Mathematics, that's why as early as now I am finding ways on how can I help her develop a positive mindset towards Math.

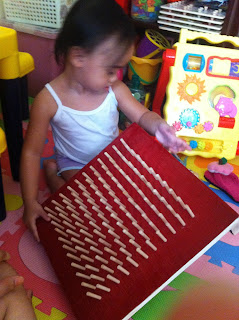
So when I discover about this Math Manipulative, I knew I had to get one, or rather make one. I asked my FIL (father-in-law) and Hubby for their help in preparing the wooden board and pushing the pins into the board, but when they found out that I was going to use push pins for the Geoboards grid, they didn't approved it thinking that it will not be safe for our toddler if the push pin accidentally detached from the wood. So I looked for an alternative for the push pins. I remember I saw a wooden pegs on a bookstore near my work. Then I draw the grids on Auto-cad with approximately 1" apart and printed it on A3 size paper.


I attached the grid print-out on the wooden board and I asked Hubby to drill the wooden board that FIL prepared.

He then cut the wooden pegs into two (because it is too long) and grind a portion of its on one end so he could easily insert it on the holes of the wooden board.


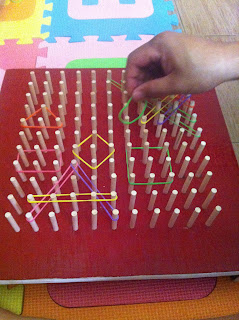
After putting up all the pegs our Geoboard is now ready for play. I took out the colorful elastic band I intentionally bought for this projects.


Here are a few of the things we did with our DIY Geoboard:

We made different shapes.


We create some letters too.


She liked stretching the elastic bands like this.


Look at Daddy's hand there, I bet he had fun creating some patterns too.


I saw a lot of printable Geoboard patterns over the net and thinking about making some Geoboard pattern cards that Jashley can recreate on the Geoboard. But I think that can wait until she's a little older, for now I let her experience the Geoboard first and allow her to create whatever shapes she wanted to make.

That's it, I hope you like our DIY Geoboard and somehow inspires you in making your own too.


Jashley's little corner

Because of the recent holiday vacation I was finally able to set up a dedicated space for Jashley's activities at home. I have been meaning to do this ever since I have learned about Montessori style of teaching.

When Jashley was still a baby we set up a play area in her room upstair, but when I started working again and my parent in laws were the one who's taking care of her during daytime, they opted to just bring some of Jashley's toys downstairs and let her play at the living area, in that case they can also do other household chores while Jashley is playing. She was also started crawling that

time so we think that letting her play downstairs is much safer. We just kept on changing the toys that we were bringing downstairs according to what we think she likes to play. When she gets a little older and was able to move on her own and able to demand what toy she wants to play, we decided to give her an easy access of her toys in our living instead of frequently asking us to get a toy for her. We just stuff it in a box every after play. Until one box became insufficient for all her toys which led us to provide her, her own space at the living area. Having read some articles about Montessori Education is also another factor that led me to push through with this plan.

According to Dr. Maria Montessori, MD, the founder of the Montessoi Method of education, "To assist a child we must provide him with an environment which will enable him to develop freely".

This is what Jashley's little corner looks like now. We already got rid the old wooden sofa that was here before to give way to this play area of my Li'l lady bug.

I wanted Jashley to have a freedom in choosing what toys she wants to play or what activity she wants to do.In that way she will become more independent.It is more than a month already since we create this area for her and I already notice a little improvement on her independence. Unlike before when her toys was all stuffed in a box, she's still need a minimal assistance from us in opening it and finding where are the toys she wants. Her playing time alone is now longer compare before because she have now an easy access on her stuffs. Currently we were teaching her to put away one toy/material after she finished using it, and before getting another.

Some Montessorian suggest to have a different area designated for different activities,  but of course it won't work if you have a limited space like ours. I just need to find a way how will I organized it to make it more clean and beautiful because I notice that sometimes she gets overwhelmed with too many toys/materials around her and ended up doing another activity without completing the first one. We also put up an activity table for her so she will not end up doing her activity anywhere, as we used to do most of our activity before on floor.

See how my Li'l Lady bug loves her own place so much, as she was always there most of the time.
making "kalat"
reading
solving puzzles
practicing her scissor skill
busy with coloring books
building a tower
loves to stay inside her castle
snacking 
taking her nap at the castle
watching television 
another favorite spot when watching
Till next time. Bye-bye!


Monday, December 28, 2015

DIY: Pasta Beads

I have been planning this beading project for weeks now, I have already accumulated all the materials needed but can't find time to do it because we're pretty busy at work now plus all the stuffs and preparations we need to do for our Christmas party. Finally I was able to do it last week since I was on my 1 week Christmas leave.

These pasta beads are actually easy to make, but will need several hours to let them fully dry.

Materials:
-macaroni pasta
-food coloring
-plastics/ziplocks

Steps:
Put about a half cup of macaroni pasta (uncooked) inside a plastic, one for each color you want to make. Add 10-15 drops of food coloring, or you may mix alcohol with the food coloring first before pouring into the macaroni, I guess it will be easier to dye the pasta this way.


Seal your plastic and shake until all pasta is fully dyed. Yo may ass more dye if you want a brighter color.

Open the plastic and allow them to sit for  awhile.


Then lay them out on a tray lined with plastic to let them dry fully.


Beading activity is a great fine motor skill activity. I have been engaging Jashley with this kind of activities lately to help her refine her movement. I love that even her concentration skill is developing with this activity.


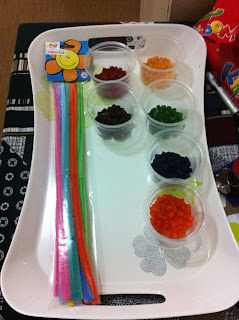
We use colorful fuzzy pipe cleaners with these DIY beads for our beading activity, you may use strings or ribbons tied on one end for older kids.


We have used this also on one of our sorting and counting activity, that will help her building her math skills.


That's it for now. We're looking forward for more activities using these colorful pasta beads.