Showing posts with label DIY toys. Show all posts

Friday, February 26, 2016

DIY: Bath Paints & Playdough

Jashley and I had fun with our colorful activities yesterday. This is what I love about holidays I get to spend a whole day of play with my daughter. Daddy went to office that day so we had the whole day to ourselves.

We did first an activity that is part of our "Letter A Activities" but I'm going to show it on a separate post as soon as we finished all the activities that are lined up for the letter A.

After we finished that activity, it was time for her bath so I decided to make a bath paints to make her bath time even more fun, after all its been months now since our last bath play.

Let's begin with the things you'll need:

1.5 cup of water
5 tablespoons of corn starch
washable paints (I used the Crayola brand)/food coloring (alternative)
a container
paint brushes

And here’s how to make it:

Dissolve cornstarch in a half cup water. In a medium cooking pan bring to boil the remaining 1 cup of water. Gently pour the water and corn starch mixture into the boiling water while continiously stirring it. You may add more corn starch if you want a more thick consistency, enough to stick to the wall. Take your containers and evenly distribute the mixture. Add a different color of washable paints in each mixture, you may use coloring food if you don't have washable paints. Now grab those paint brushes and let your little one have fun painting.


Reminder: Don't forget to test the paint first and see if it won't stain your toilet walls.

I can't tell the excitement she felt after I invited her and saw the paint pots I set up inside the bathroom. She exclaimed "Wow! What's that Mommy?" Since she already can identify colors I just explain to her what paint is and how to use it. After a little demo I let her experience it.


"Look Mommy I made an H"


Of course it wasn’t long before the paint brush was discarded and the hand painting began.  
I thought it's a perfect time to teach her the secondary colors, so while she is submerging her little hand into each of the bath paints container. I explained to her that yellow & red makes orange, blue & yellow makes green, red and blue makes violet. 
The cleaning part was fun for her too. Look how easily the paint washes off.
I love that my little girl was not only squeaky clean after this but also pretty much had her art class inside the bath. 
After bathing we had our lunch and I set her for her afternoon nap. While she was taking her nap I prepare another activity.

On our recent grocery trip Jashley saw a set of play-dough at the toy section and asked us to buy one. But Hubby didn't allow us to buy because of an incident happen before. She was a year and a half old back then when she put a piece of play-dough on her mouth and chew it while playing with a friend's kids play-dough, luckily Mommy was fast enough to remove it in her mouth before she was able to swallow it. So since then we always put on hold any activity that involves play-dough.

But because she was now getting curious about this play-dough that she saw on toy reviews on YouTube and always  asking me if I can buy play-dough for her, I wonder if I can make an edible one or at least something that is not toxic compare to those commercially available ones. I searched online for recipes, there were a lot of them, and I actually wanted to do the no cook recipe, but most of the recipes that says "best homemade play-dough" always requires to be cooked. So I decided to make the cooked one.

Here's the materials you'll need:


1 cup of water
1 cup of flour
1/2 cup of salt
1 tablespoon of oil
1 tablespoon cream of tartar
food coloring
a cooking pan and a spoon

Here's how to do it:

1. Combine water, flour, salt, oil, & cream of tartar in the cooking pan.
2. Cook over low heat, stirring constantly until it thickens and begin to gather around the spoon.

3. Remove from the stove and let it cool.
4  Divide it evenly depends on how many colors you wanted to make.
4. Knead it and add a drop of food coloring. You may sprinkle more flour while kneading if it is a little sticky.

Take out your cookie cutters and plastic/toy knife and your now ready to play.


Here's my Little Lady Bug excited for her homemade play-dough.

After a demo, there she is looking like an expert in kneading her dough.
Cutting with the cookie cutters.
Mommy's bunny and Jashley's bear and elephant.
Cutting using her plastic toy knife.

She made a birthday cake for Mommy too. 
Beside the fun that it gives the child, this activity is great for developing strength in the hands and fingers and is perfect for building those fine motor skills too.

I guess she love this activity so much that she asked mo to play with it again this weekend


So that's how we spend our colorful and fun holiday. Till next time.

Tuesday, January 5, 2016

DIY Math Manipulative: Geoboard

I recently discovered Geoboard while I was searching for an activities I can prepare for Jashley, I'd never saw or even heard of a Geoboard before. I got curious and started googling about it.

What is Geoboard?

A geoboard is a manipulative tool used to explore basic concepts in geometry such as area, perimeter, triangles and other polygons. It is great in developing early mathematical skills of children that will help them with problem solving, critical thinking, and learning spatial awareness.

As a child I grew up hating Math because I find it difficult to understand, well aside from the basic addition, subtraction, multiplication and division. I don't want Jashley to be like that, I want her to love Mathematics, that's why as early as now I am finding ways on how can I help her develop a positive mindset towards Math.

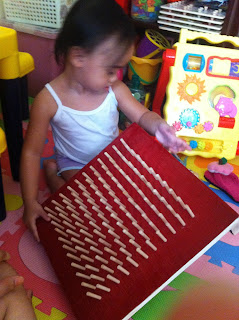
So when I discover about this Math Manipulative, I knew I had to get one, or rather make one. I asked my FIL (father-in-law) and Hubby for their help in preparing the wooden board and pushing the pins into the board, but when they found out that I was going to use push pins for the Geoboards grid, they didn't approved it thinking that it will not be safe for our toddler if the push pin accidentally detached from the wood. So I looked for an alternative for the push pins. I remember I saw a wooden pegs on a bookstore near my work. Then I draw the grids on Auto-cad with approximately 1" apart and printed it on A3 size paper.


I attached the grid print-out on the wooden board and I asked Hubby to drill the wooden board that FIL prepared.

He then cut the wooden pegs into two (because it is too long) and grind a portion of its on one end so he could easily insert it on the holes of the wooden board.


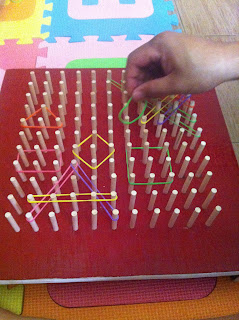
After putting up all the pegs our Geoboard is now ready for play. I took out the colorful elastic band I intentionally bought for this projects.


Here are a few of the things we did with our DIY Geoboard:

We made different shapes.


We create some letters too.


She liked stretching the elastic bands like this.


Look at Daddy's hand there, I bet he had fun creating some patterns too.


I saw a lot of printable Geoboard patterns over the net and thinking about making some Geoboard pattern cards that Jashley can recreate on the Geoboard. But I think that can wait until she's a little older, for now I let her experience the Geoboard first and allow her to create whatever shapes she wanted to make.

That's it, I hope you like our DIY Geoboard and somehow inspires you in making your own too.


Tuesday, November 24, 2015

Playful Parenting Is My Solution

Eversince I found out that I am having a baby girl, I already envisioned "us" doing and enjoying a lot of things together, and one of those is this. When I started working again, one of my worry wss that Jashley will become more attached to her lolo and lola than to me because they are the one who is taking care of her while we're on our job. So thus playful parenting became my solution.

I always make sure that during weekends or holidays we have a precious time together doing fun & enjoyable things that allow her to learn and us to bond. And because I love crafts it meant fun for me too and also become an outlet for my DIY fantasies.

Here are some of the activities we had during the recent APEC holidays. 

I let her stick stickers on the door and some on my arms & legs. 


Next is these colorful Popsicle sticks. I just trace a Popsicle stick on a plain paper to make some shape patterns and color them in different colors that will be a guide on what Popsicle color she have to use. After completing the shape, I explain to her the attributes of that particular shape. All you need are some popsicle sticks, a paper and a crayons or a markers. 


Then she discover another activity she can do with these colorful sticks. I left her for awhile and came back to this busy little bug. 

I asked her what she's doing, her reply was "I'm building a castle". Afterwards she tries to fit herself in but found out that only her favorite bear can fit in, 

so she decided to rebuild it and made sure that she will fit in this time. 

The next day I made this container out of an empty milk carton, I put a colorful construction paper on top and a slot on each color that will correspond into what Popsicle stick she have to insert. 


This will not only make her master her color recognition but it is also a great fine motor ability exercise using her pincer grasp to pick up the sticks and push them through the slot. 

This was a hit for her since she kept on asking for this the entire day. 


If the previous activity was a hit, this next one is a little miss for her, after inserting the shoelace for about 2-3 holes in each shape, she already gave up and don't want to touch the activity again or maybe she's just not yet ready for that kind of activity. 


I'll keep this for now and wait until she become ready.

But among all those activities we did, I bet that her favorite was this. This is actually not part of the activities planned for that holiday, the original plan was to bring her in the play area at the mall since she was recently bugging us that she wanted to swim on balls. But unfortunately we wasn't able to bring her to the mall for some reasons. I am just lucky that I was able to squeeze-in those playtime in between. Anyway, in order to fulfill the promise that we made to her, Hubby brought out her inflatable pool and bought those toys at the nearby market, but since the price of the ball were too expensive for 10 pesos each compare to the one that I saw at the toy store which sold in bulk, Hubby decided to just buy a few pieces and will just fill it up next time. 


My little girl was so happy and keep on hugging and kissing and saying thank you to her Daddy.


This style of parenting maybe time consuming in terms of preparation but I like it that way, its my way of making her feel that I love her and I enjoy playing with her.