Showing posts with label manipulatives. Show all posts

Tuesday, January 5, 2016

DIY Math Manipulative: Geoboard

I recently discovered Geoboard while I was searching for an activities I can prepare for Jashley, I'd never saw or even heard of a Geoboard before. I got curious and started googling about it.

What is Geoboard?

A geoboard is a manipulative tool used to explore basic concepts in geometry such as area, perimeter, triangles and other polygons. It is great in developing early mathematical skills of children that will help them with problem solving, critical thinking, and learning spatial awareness.

As a child I grew up hating Math because I find it difficult to understand, well aside from the basic addition, subtraction, multiplication and division. I don't want Jashley to be like that, I want her to love Mathematics, that's why as early as now I am finding ways on how can I help her develop a positive mindset towards Math.

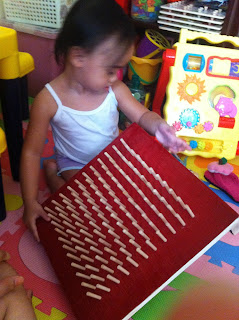
So when I discover about this Math Manipulative, I knew I had to get one, or rather make one. I asked my FIL (father-in-law) and Hubby for their help in preparing the wooden board and pushing the pins into the board, but when they found out that I was going to use push pins for the Geoboards grid, they didn't approved it thinking that it will not be safe for our toddler if the push pin accidentally detached from the wood. So I looked for an alternative for the push pins. I remember I saw a wooden pegs on a bookstore near my work. Then I draw the grids on Auto-cad with approximately 1" apart and printed it on A3 size paper.


I attached the grid print-out on the wooden board and I asked Hubby to drill the wooden board that FIL prepared.

He then cut the wooden pegs into two (because it is too long) and grind a portion of its on one end so he could easily insert it on the holes of the wooden board.


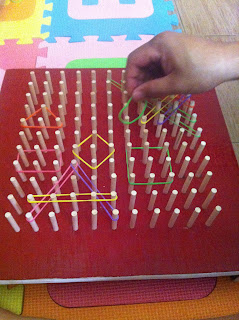
After putting up all the pegs our Geoboard is now ready for play. I took out the colorful elastic band I intentionally bought for this projects.


Here are a few of the things we did with our DIY Geoboard:

We made different shapes.


We create some letters too.


She liked stretching the elastic bands like this.


Look at Daddy's hand there, I bet he had fun creating some patterns too.


I saw a lot of printable Geoboard patterns over the net and thinking about making some Geoboard pattern cards that Jashley can recreate on the Geoboard. But I think that can wait until she's a little older, for now I let her experience the Geoboard first and allow her to create whatever shapes she wanted to make.

That's it, I hope you like our DIY Geoboard and somehow inspires you in making your own too.


Monday, December 28, 2015

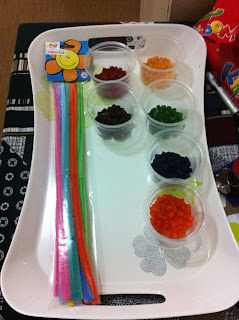
DIY: Pasta Beads

I have been planning this beading project for weeks now, I have already accumulated all the materials needed but can't find time to do it because we're pretty busy at work now plus all the stuffs and preparations we need to do for our Christmas party. Finally I was able to do it last week since I was on my 1 week Christmas leave.

These pasta beads are actually easy to make, but will need several hours to let them fully dry.

Materials:
-macaroni pasta
-food coloring
-plastics/ziplocks

Steps:
Put about a half cup of macaroni pasta (uncooked) inside a plastic, one for each color you want to make. Add 10-15 drops of food coloring, or you may mix alcohol with the food coloring first before pouring into the macaroni, I guess it will be easier to dye the pasta this way.


Seal your plastic and shake until all pasta is fully dyed. Yo may ass more dye if you want a brighter color.

Open the plastic and allow them to sit for  awhile.


Then lay them out on a tray lined with plastic to let them dry fully.


Beading activity is a great fine motor skill activity. I have been engaging Jashley with this kind of activities lately to help her refine her movement. I love that even her concentration skill is developing with this activity.


We use colorful fuzzy pipe cleaners with these DIY beads for our beading activity, you may use strings or ribbons tied on one end for older kids.


We have used this also on one of our sorting and counting activity, that will help her building her math skills.


That's it for now. We're looking forward for more activities using these colorful pasta beads.

Tuesday, December 15, 2015

DIY: Movable Flat Marble Alphabets

Most of the Montessori Teaching tools I am checking online were a little expensive. And If you know me so well, this frugal Mamma won't spend much on those expensive items, I will always find a much cheaper alternative or rather make my own.

I am wanting to buy the Melissa and Doug movable letters since I saw them on the bookstore last month but the price of it was way way out of my budget. We have a set of these magnetic ones that I bought from the toy store for around 100php but the set only consist of 1 piece per letter, meaning I have to buy a few more set because some activities that I have in mind would require around 2-3 pieces of some of the letters. For example; a spelling activity of Lady Bug's name, her 2 names will be needing 3 letter L, If I'm going to buy 2 or 3 more set of these letters that would cost me 300php.

So I have been searching for a cheap alternative and that would only mean DIY. I am so happy when I found a site that has a step by step instruction for a DIY Movable Flat Marble Alphabets. I'm sure that those flat marbles were so cheap and can be bought on the local flower shops.

You wouldn't believe how much I spent on this project. The print-out for the disk letters which I layout on Photoshop and the flat marbles are the only items I paid for that is intended for this project, and it only cost me 60php for the 2 packs of flat marbles that contains around 60pcs each pack and 5php for the print out. Glue and paint brush were items from previous projects. I was able to make 4 pcs (1 capital and 3 small letters) of each of the letters of the alphabet for less than 100php.


So following the instruction from this site, we now have our own DIY Movable Flat Marble Alphabets that we can use on our next activities.


Here's my Little Lady Bug having her name spelling activity using our movable letters.


That's it for now, if you want to have a copy of my movable disk letters you may download from this link, and fit it on an A4 size paper. Thanks for stopping by!