Monday, January 21, 2013

DIY: Coin Pillow

When I saw this pink polka dots pillow in Daiso, I quickly grab it thinking this is a great pillow for our Coin Pillow. I just basically add the silver satin flowers that I made, tie a ribbon at the bottom part, and just sew a covered button in the center, I am planning to put the coins in a see-through fabric pouch and just sit it at the center of the pillow. 


-♥♥♥-


DIY: Bunting

Another finished DIY is our bunting  that we're gonna use in decorating our DIY candy buffet table. I don't know yet the exact size of the table that the venue will provide for us so I just prepared 2 extra triangle flags in case we need a longer bunting. 


DIY: Guestbook Sign


Initially my plan is to use scrabble tiles to spell the "SIGN OUR GUESTBOOK" as a decoration in our registration table. But because of these wooden blocks that I found in Daiso, the scrabble tiles is now out of the picture.Hehe...

 Here's what I did, luckily the size of the letters in my template is just right for the size of the blocks that i bought. I just simply trace the letters on the wooden blocks using a permanent markers.
And voila!!! instant decoration. =)

 -♥♥♥-

DIY: Fabric Flowers

Another accomplished DIY are these cute assorted flowers. I really had fun making these flowers and actually don't know yet where will I use some of them. Sorry I dont have the procedure on how to do it, I just randomly searched tutorials over the net and try to do it.  

 -♥♥♥-

DIY: "Here Comes the Bride" Banner

3 more weeks before our "Big Day", and I still need to do alot of DIYs, I actually accomplished alot of thing last week. And I am sharing you one of those. I actually cross this out on my list since I cannot find a burlap fabric here in singapore, but when I saw this pink fabric in Daiso (i don'y know exactly what kind of fabric is this), an idea hit me, and I think it would be a perfect alternative to a burlap fabric for this project. I also bought the letter template to use for this project.

I cut out letters to spell the "KUYA BRY" on the gray felt fabric then cover it with a lace fabric (this lace fabric is actually a lace curtain that I also got from Daiso). I do the same procedure for the "BRIDE" but using a white felt fabric as a base. 


 Then I write the "HERE COMES" using the template on the pink fabric, and freehand writing the "YOUR" word.  And finally I attached the cut out letters to the pink fabric using fabric glue.

Here is the final product. I add a heart shape on top of the letter I on the BRIDE. I am still thinking if I will use a stick or just attach a string for the handle on top.   

And here is my inspiration. I think i will also add some flower embelishments on sides.

 -♥♥♥-

Bridal Shoes

Yey!!! Finally bought my bridal shoes yesterday.

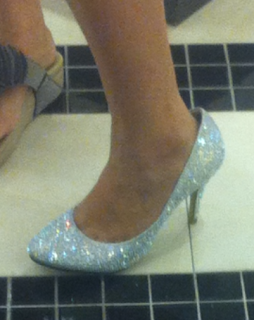
I actually thinking choosing between this silver shoes with crystals embelishments 

and this pink peep toe with crochet detail at the back (sorry for the blurred pic). 

honeyko likes the silver one, but I think the pink one is much appropriate for our shabby chic theme and will compliment with my bridal dress since it has a lace design on top.

So I got the pink one.


 -♥♥♥-

Friday, January 11, 2013

DIY: Boutonniere


Whhheee!!! I'm done with our DIY boutonniere, and I'm so excited to share it.

Here is the materials I used. Lace & felt fabrics, ribbons, crochet doilies, buttons, and of course fabric adhesive (that i just forgot to include on this photo).

Sorry I don't have pictures for the step by step guide on how to do it, but I am pretty sure you can figure it out how I create this. So easy. 

Final product.

Close up.

30 days to go before our Big day., and i still have a lot of DIY's to finish.

 -♥♥♥-