Tuesday, January 5, 2016

DIY Math Manipulative: Geoboard

I recently discovered Geoboard while I was searching for an activities I can prepare for Jashley, I'd never saw or even heard of a Geoboard before. I got curious and started googling about it.

What is Geoboard?

A geoboard is a manipulative tool used to explore basic concepts in geometry such as area, perimeter, triangles and other polygons. It is great in developing early mathematical skills of children that will help them with problem solving, critical thinking, and learning spatial awareness.

As a child I grew up hating Math because I find it difficult to understand, well aside from the basic addition, subtraction, multiplication and division. I don't want Jashley to be like that, I want her to love Mathematics, that's why as early as now I am finding ways on how can I help her develop a positive mindset towards Math.

So when I discover about this Math Manipulative, I knew I had to get one, or rather make one. I asked my FIL (father-in-law) and Hubby for their help in preparing the wooden board and pushing the pins into the board, but when they found out that I was going to use push pins for the Geoboards grid, they didn't approved it thinking that it will not be safe for our toddler if the push pin accidentally detached from the wood. So I looked for an alternative for the push pins. I remember I saw a wooden pegs on a bookstore near my work. Then I draw the grids on Auto-cad with approximately 1" apart and printed it on A3 size paper.


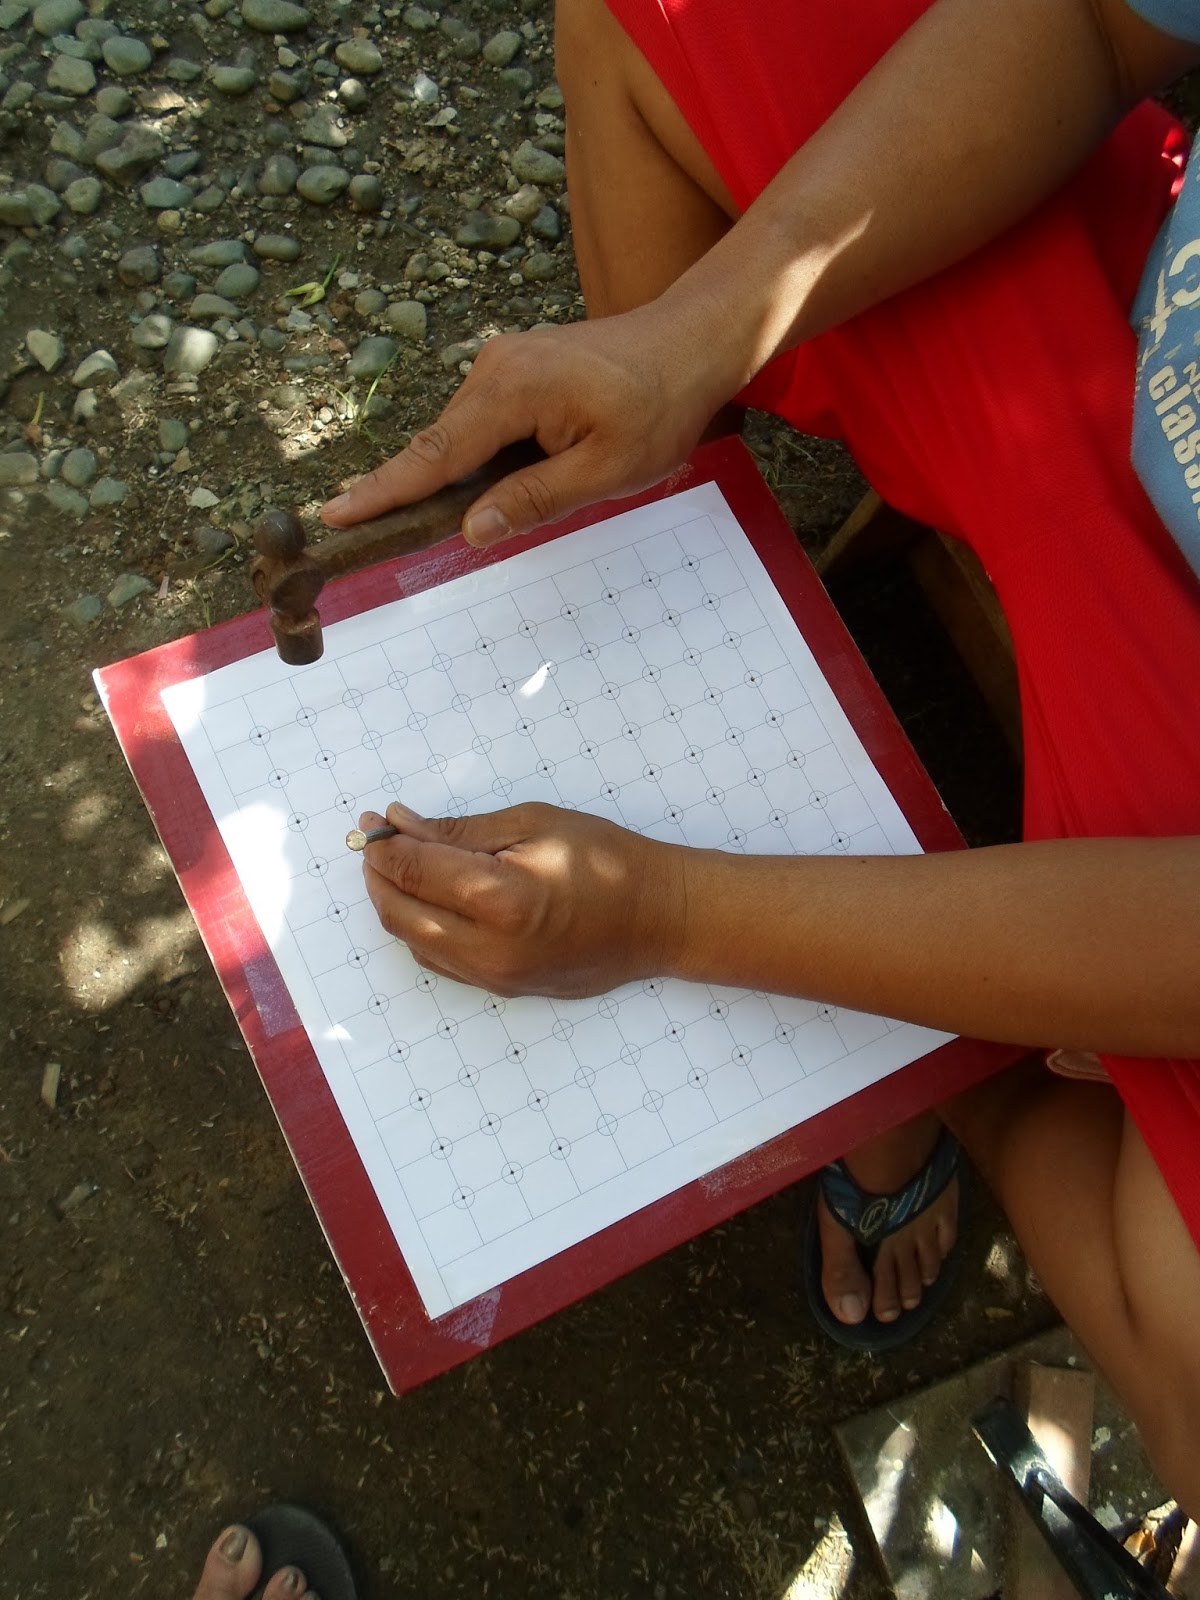
I attached the grid print-out on the wooden board and I asked Hubby to drill the wooden board that FIL prepared.

He then cut the wooden pegs into two (because it is too long) and grind a portion of its on one end so he could easily insert it on the holes of the wooden board.


After putting up all the pegs our Geoboard is now ready for play. I took out the colorful elastic band I intentionally bought for this projects.


Here are a few of the things we did with our DIY Geoboard:

We made different shapes.


We create some letters too.


She liked stretching the elastic bands like this.


Look at Daddy's hand there, I bet he had fun creating some patterns too.


I saw a lot of printable Geoboard patterns over the net and thinking about making some Geoboard pattern cards that Jashley can recreate on the Geoboard. But I think that can wait until she's a little older, for now I let her experience the Geoboard first and allow her to create whatever shapes she wanted to make.

That's it, I hope you like our DIY Geoboard and somehow inspires you in making your own too.


Jashley's little corner

Because of the recent holiday vacation I was finally able to set up a dedicated space for Jashley's activities at home. I have been meaning to do this ever since I have learned about Montessori style of teaching.

When Jashley was still a baby we set up a play area in her room upstair, but when I started working again and my parent in laws were the one who's taking care of her during daytime, they opted to just bring some of Jashley's toys downstairs and let her play at the living area, in that case they can also do other household chores while Jashley is playing. She was also started crawling that

time so we think that letting her play downstairs is much safer. We just kept on changing the toys that we were bringing downstairs according to what we think she likes to play. When she gets a little older and was able to move on her own and able to demand what toy she wants to play, we decided to give her an easy access of her toys in our living instead of frequently asking us to get a toy for her. We just stuff it in a box every after play. Until one box became insufficient for all her toys which led us to provide her, her own space at the living area. Having read some articles about Montessori Education is also another factor that led me to push through with this plan.

According to Dr. Maria Montessori, MD, the founder of the Montessoi Method of education, "To assist a child we must provide him with an environment which will enable him to develop freely".

This is what Jashley's little corner looks like now. We already got rid the old wooden sofa that was here before to give way to this play area of my Li'l lady bug.

I wanted Jashley to have a freedom in choosing what toys she wants to play or what activity she wants to do.In that way she will become more independent.It is more than a month already since we create this area for her and I already notice a little improvement on her independence. Unlike before when her toys was all stuffed in a box, she's still need a minimal assistance from us in opening it and finding where are the toys she wants. Her playing time alone is now longer compare before because she have now an easy access on her stuffs. Currently we were teaching her to put away one toy/material after she finished using it, and before getting another.

Some Montessorian suggest to have a different area designated for different activities,  but of course it won't work if you have a limited space like ours. I just need to find a way how will I organized it to make it more clean and beautiful because I notice that sometimes she gets overwhelmed with too many toys/materials around her and ended up doing another activity without completing the first one. We also put up an activity table for her so she will not end up doing her activity anywhere, as we used to do most of our activity before on floor.

See how my Li'l Lady bug loves her own place so much, as she was always there most of the time.
making "kalat"
reading
solving puzzles
practicing her scissor skill
busy with coloring books
building a tower
loves to stay inside her castle
snacking 
taking her nap at the castle
watching television 
another favorite spot when watching
Till next time. Bye-bye!


Monday, December 28, 2015

DIY: Pasta Beads

I have been planning this beading project for weeks now, I have already accumulated all the materials needed but can't find time to do it because we're pretty busy at work now plus all the stuffs and preparations we need to do for our Christmas party. Finally I was able to do it last week since I was on my 1 week Christmas leave.

These pasta beads are actually easy to make, but will need several hours to let them fully dry.

Materials:
-macaroni pasta
-food coloring
-plastics/ziplocks

Steps:
Put about a half cup of macaroni pasta (uncooked) inside a plastic, one for each color you want to make. Add 10-15 drops of food coloring, or you may mix alcohol with the food coloring first before pouring into the macaroni, I guess it will be easier to dye the pasta this way.


Seal your plastic and shake until all pasta is fully dyed. Yo may ass more dye if you want a brighter color.

Open the plastic and allow them to sit for  awhile.


Then lay them out on a tray lined with plastic to let them dry fully.


Beading activity is a great fine motor skill activity. I have been engaging Jashley with this kind of activities lately to help her refine her movement. I love that even her concentration skill is developing with this activity.


We use colorful fuzzy pipe cleaners with these DIY beads for our beading activity, you may use strings or ribbons tied on one end for older kids.


We have used this also on one of our sorting and counting activity, that will help her building her math skills.


That's it for now. We're looking forward for more activities using these colorful pasta beads.

Tuesday, December 15, 2015

DIY: Movable Flat Marble Alphabets

Most of the Montessori Teaching tools I am checking online were a little expensive. And If you know me so well, this frugal Mamma won't spend much on those expensive items, I will always find a much cheaper alternative or rather make my own.

I am wanting to buy the Melissa and Doug movable letters since I saw them on the bookstore last month but the price of it was way way out of my budget. We have a set of these magnetic ones that I bought from the toy store for around 100php but the set only consist of 1 piece per letter, meaning I have to buy a few more set because some activities that I have in mind would require around 2-3 pieces of some of the letters. For example; a spelling activity of Lady Bug's name, her 2 names will be needing 3 letter L, If I'm going to buy 2 or 3 more set of these letters that would cost me 300php.

So I have been searching for a cheap alternative and that would only mean DIY. I am so happy when I found a site that has a step by step instruction for a DIY Movable Flat Marble Alphabets. I'm sure that those flat marbles were so cheap and can be bought on the local flower shops.

You wouldn't believe how much I spent on this project. The print-out for the disk letters which I layout on Photoshop and the flat marbles are the only items I paid for that is intended for this project, and it only cost me 60php for the 2 packs of flat marbles that contains around 60pcs each pack and 5php for the print out. Glue and paint brush were items from previous projects. I was able to make 4 pcs (1 capital and 3 small letters) of each of the letters of the alphabet for less than 100php.


So following the instruction from this site, we now have our own DIY Movable Flat Marble Alphabets that we can use on our next activities.


Here's my Little Lady Bug having her name spelling activity using our movable letters.


That's it for now, if you want to have a copy of my movable disk letters you may download from this link, and fit it on an A4 size paper. Thanks for stopping by!

Friday, December 11, 2015

DIY: Halloween Clown Costume

Sharing you my DIY Halloween Costume that Jashley wore on our company Halloween Party last Month.

Materials:
tulle (I used around 2.5 yards of tulle or 0.5 yard per color)
elastic/garter
ribbons
pompoms/buttons
bow-tie
plain sando/shirt
scissor
glue gun & glue sticks
sewing stuffs
colorful stripped tights


Procedure:
For the tutu skirt.
1. Measure waist. Make your elastic into loop and sew the overlap ends (subtract 2-3 inches smaller as the elastic will stretch)
2. Cut your tulle into strip. The length should be twice of your desired skirt length. The number of pieces of these strips will depend how full you want your skirt.


3. Put the elastic onto something that can hold it nicely for you.
4. Fold the tulle strips in half, put the folded end of the strip under the elastic, open the folded end, then slip up the other end through it to make a slipknot. Repeat the process until the entire elastic band is covered with tulle. Make sure that the knots were tight by pulling them, so it won't look lumpy on waist.


For the top.
1. Get a plain shirt/sando. In my case since I don't want to spend much money on this project, I just used whatever plain top available on my daughter's closet.


2. Sew a row of brightly colored buttons or pompoms. Better if you have large ones but since I only have small pompoms, what I did was make a tulle flower first then used the pompoms as a center ornament for the flower to make it look bigger.
3. Sew a length of ribbon on each front side of the top. These ribbons represents the suspenders of  the clown pants.
4. Sew a bow-tie under the chin area of the top. In my case since I don't have a bow-tie, I made it using the scrap tulle from the tutu skirt, you can use other fabric if you have one.

For the bottom I just bought a colorful stripped tights that she wore under her tutu skirt. For the shoes, clown shoes are usually big and over-sized but since I don't want to spend much for this costume we just settled on whatever shoes she have that will look fine on her outfit.

So there you go that was my DIY clown costume for my little cutie clown here. This is so easy that I managed to make this a night before the event.


By the way I DIY'ed also her colorful hair clips. You just need to cut a few strip of ribbon of the same length, fold them in half and glue their ends, take 1 folded strip of ribbon put a small blob of glue on the ends, layer your next folded strip slightly over the initial strip. Continue the entire way around your flower. For the embelishment I used an old ribbon from one of her broken hair clips and glued it at the center of the flower. Then attached a clip under the flower. Easy peasy.


Till next DIY. =)